Работа с MicroStock+ Sync/en: различия между версиями
(Новая страница: «Apple company denies using third-party software if it doesn't have Trusted eSign even if it’s 100% safe. To bypass the protection system do the following: * In...») |
|||
| (не показано 5 промежуточных версий 2 участников) | |||
| Строка 1: | Строка 1: | ||
| − | Microstock+ Sync is a software for one-way synchronization | + | Microstock+ Sync is a software for one-way synchronization from the M+ cloud storage to your PC. The program allows you to finely select the folders you would like to keep synchronized and preserves the M+ directory structure. As long as the synchronization is active, any changes in files and metadata in the selected folders are instantly reflected on your hard drive.<br /> |
| − | The sortware is free to use and runs on Windows, Mac OS X and Linux. | + | The sortware is completely free to use and runs on Windows, Mac OS X and Linux. |
==Downloading and installing M+ Sync== | ==Downloading and installing M+ Sync== | ||
| − | + | Simply click on the M+ Syncer section in the M+ interface to get to the app home page. | |
<gallery widths=500px heights=200px perrow=7> | <gallery widths=500px heights=200px perrow=7> | ||
File:Sync start 2_eng.png|center|frame| | File:Sync start 2_eng.png|center|frame| | ||
</gallery> | </gallery> | ||
| − | Click the "Download" button and choose your | + | Click the "Download" button and choose your OS to download the installer. |
===Windows users=== | ===Windows users=== | ||
| − | Download | + | Download the installation package, run it with a double click and follow the instructions. Permit the installation if the system asks you to. Once the installation is completed, you can launch the program using its shortcut on the desktop or from the Start menu. |
===Mac OS X users=== | ===Mac OS X users=== | ||
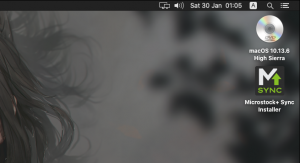
| − | Download | + | Download the installation package and open it with a double click. It will mount the installer image automatically and you will see the "Microstock+ Sync Installer" icon on your desktop. Open it with a double-click and move the app in the window that will appear as the arrow there suggests. |
| − | <gallery widths= | + | <gallery widths=300px heights=200px perrow=7> |
File:Sync mac start.png|center|frame|Installer file with a logo | File:Sync mac start.png|center|frame|Installer file with a logo | ||
File:Sync mac start2.png|center|frame|Drag and drop the app | File:Sync mac start2.png|center|frame|Drag and drop the app | ||
</gallery> | </gallery> | ||
| − | Apple | + | Apple doesn't allow running third-party apps if they don't have the Trusted eSign even if they're 100% safe. To bypass the protection system please do the following: |
| − | * In the top right desktop | + | * Launch the program. You'll receive a message that the program has been blocked by the security system |
| − | * | + | * Open the settings and find "Security and Privacy" section |
| + | * Click the "Open anyway" button | ||
| + | * Commit the changes in the dialogue box | ||
| + | |||
| + | <gallery widths=450px heights=400px perrow=7> | ||
| + | File:Launch_mac1.jpg|center|frame|Settings | ||
| + | File:Launch_mac2.jpg|center|frame|The dialog box | ||
| + | </gallery> | ||
| + | |||
| + | The alternative way: | ||
| + | * In the top right corner of your desktop click the icon with a magnifying glass | ||
| + | * Type "Terminal" and press Enter | ||
* Open the Terminal app | * Open the Terminal app | ||
* Input <code> sudo spctl --master-disable </code> | * Input <code> sudo spctl --master-disable </code> | ||
| − | * Press Enter and | + | * Press Enter and then close the window |
| − | This should allow you | + | This should allow you to start the program. |
<gallery widths=300px heights=200px perrow=7> | <gallery widths=300px heights=200px perrow=7> | ||
File:Apple search.png|center|frame|Search | File:Apple search.png|center|frame|Search | ||
| Строка 33: | Строка 44: | ||
===Linux users=== | ===Linux users=== | ||
| − | Download | + | Download the app archive and extract it into a folder of your choice. Find the MPSyncer.UI file inside and double-click it to launch the program. |
==How to work with Microstock+ Sync?== | ==How to work with Microstock+ Sync?== | ||
| − | === | + | ===Logging in=== |
| − | Launch the program and fill the form with your M+ email and password or sign in | + | Launch the program and fill the form with your M+ email and password or sign in using an external service. If you don't have a M+ account yet - please register there first. |
===Launching and configuring the M+Sync=== | ===Launching and configuring the M+Sync=== | ||
| − | + | First time you run M+ Sync, you will have to choose or create a folder that will serve as the root for the synchronization. You can change it later, but that will restart the synchronization process from scratch (unless you move your files there first). | |
| − | Once the folder is chosen | + | Once the folder is chosen or created, you will be able to configure the program using the top menu. |
| − | * | + | * Use "Account" to log out or visit the M+ store (Pricing); |
| − | * | + | * Use "Settings" to enable/disable the app autostart, change the interface language or modify the synchronization interval (in minutes); |
| − | * | + | * Use "Help" to open a support chat or to read this article (M+ FAQ). |
===Working with folders=== | ===Working with folders=== | ||
| − | To synchronize | + | To synchronize a specific M+ folder to a folder on your PC you can create a connection between them. In the left column (File tree) choose a folder you want to synchronize, click on the green button with a computer and a chain icon and specify any folder on your PC (or create a new one). When you synchronize a folder, all of its subfolders will be automatically synchronized so you don't have to create a connection for every subfolder manually. |
[[File: Sync create connection.png|left|300px]]<br clear=all> | [[File: Sync create connection.png|left|300px]]<br clear=all> | ||
| − | To avoid | + | To avoid confusion and errors M+ Sync doesn't allow synchronizing two or more M+ folders into the same folder on your PC. If you try to do so, you will receive a message explaining that. In that case you will have to create/choose another folder.<br /> |
| − | To | + | To remap a connected folder to another folder on your PC, simply click on the currently connected folder and specify another one.<br /> |
[[File: Sync change fold.png|left|300px]]<br clear=all> | [[File: Sync change fold.png|left|300px]]<br clear=all> | ||
| − | To break a connection between | + | To break a connection between folders, click the icon with a chain once so it turns into a red cross. All files that were already synchronized will remain on your PC.<br /> |
[[File: Sync deconnect.png|left|300px]]<br clear=all> | [[File: Sync deconnect.png|left|300px]]<br clear=all> | ||
| − | If you decide to re-connect folders after breaking | + | If you decide to re-connect folders after breaking the connection between them, M+ Sync will scan the files and update the local copy to ensure they match with the M+ version. After that it will continue the synchronization.<br /> |
| − | To start | + | To start the synchronization press the toggle to the right. |
[[File: Sync process start.png|left|300px]]<br clear=all> | [[File: Sync process start.png|left|300px]]<br clear=all> | ||
| − | A progress bar for this folder will appear to the right. | + | A progress bar for this folder will appear to the right. There will be also a summary progress bar at the bottom of the app window that will display the total progress and ETA for all folders currently being synchronized. |
| − | + | Files will be downloaded to the folder you have connected. If you're synchronizing a subfolder, a gray progress bar will appear for all folders containing it so that you won't miss what subfolders are being synchronized. | |
| − | Two right columns contain basic information about | + | The app will keep periodically checking the M+ copy of the files for any new changes and will synchronize your local files to be up to date at all times. Interval of this check can be specified in settings as described above.<br /> |
| + | Two right-most columns contain basic information about the folders and their content: their total size and how many files and subfolders are inside. | ||
===Closing the app=== | ===Closing the app=== | ||
| − | On Windows clicking | + | On Windows clicking the close button in the top right corner will minimize the program into the taskbar. To close it completely, right click on the M+ Sync icon there and choose the quit command. Please note that Windows may hide infrequently used icons if you didn't disable it so you may have to click the button to reveal the hidden icons first. Alternatively, use Alt + F4 hotkey while the program window is active. |
On Mac OS X use Cmd + Q shortcut or close it in the Dock panel. | On Mac OS X use Cmd + Q shortcut or close it in the Dock panel. | ||
==Removing the program== | ==Removing the program== | ||
| − | Use standard | + | Use the standard uninstall methods to remove the program (Windows and Mac OS X) or just remove the program folder (Linux). |
Текущая версия на 16:42, 1 марта 2021
Microstock+ Sync is a software for one-way synchronization from the M+ cloud storage to your PC. The program allows you to finely select the folders you would like to keep synchronized and preserves the M+ directory structure. As long as the synchronization is active, any changes in files and metadata in the selected folders are instantly reflected on your hard drive.
The sortware is completely free to use and runs on Windows, Mac OS X and Linux.
Содержание
Downloading and installing M+ Sync
Simply click on the M+ Syncer section in the M+ interface to get to the app home page.

Click the "Download" button and choose your OS to download the installer.
Windows users
Download the installation package, run it with a double click and follow the instructions. Permit the installation if the system asks you to. Once the installation is completed, you can launch the program using its shortcut on the desktop or from the Start menu.
Mac OS X users
Download the installation package and open it with a double click. It will mount the installer image automatically and you will see the "Microstock+ Sync Installer" icon on your desktop. Open it with a double-click and move the app in the window that will appear as the arrow there suggests.
Installer file with a logo
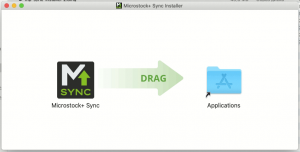
Drag and drop the app


Apple doesn't allow running third-party apps if they don't have the Trusted eSign even if they're 100% safe. To bypass the protection system please do the following:
- Launch the program. You'll receive a message that the program has been blocked by the security system
- Open the settings and find "Security and Privacy" section
- Click the "Open anyway" button
- Commit the changes in the dialogue box
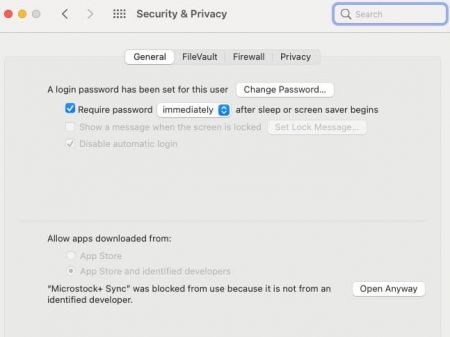
Settings
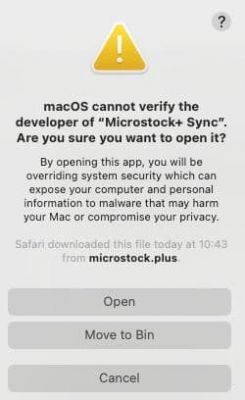
The dialog box


The alternative way:
- In the top right corner of your desktop click the icon with a magnifying glass
- Type "Terminal" and press Enter
- Open the Terminal app
- Input
sudo spctl --master-disable - Press Enter and then close the window
This should allow you to start the program.
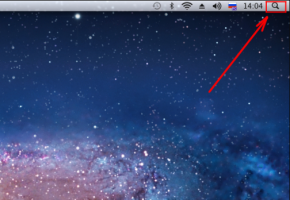
Search
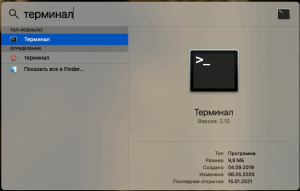
Terminal


Linux users
Download the app archive and extract it into a folder of your choice. Find the MPSyncer.UI file inside and double-click it to launch the program.
How to work with Microstock+ Sync?
Logging in
Launch the program and fill the form with your M+ email and password or sign in using an external service. If you don't have a M+ account yet - please register there first.
Launching and configuring the M+Sync
First time you run M+ Sync, you will have to choose or create a folder that will serve as the root for the synchronization. You can change it later, but that will restart the synchronization process from scratch (unless you move your files there first). Once the folder is chosen or created, you will be able to configure the program using the top menu.
- Use "Account" to log out or visit the M+ store (Pricing);
- Use "Settings" to enable/disable the app autostart, change the interface language or modify the synchronization interval (in minutes);
- Use "Help" to open a support chat or to read this article (M+ FAQ).
Working with folders
To synchronize a specific M+ folder to a folder on your PC you can create a connection between them. In the left column (File tree) choose a folder you want to synchronize, click on the green button with a computer and a chain icon and specify any folder on your PC (or create a new one). When you synchronize a folder, all of its subfolders will be automatically synchronized so you don't have to create a connection for every subfolder manually.

To avoid confusion and errors M+ Sync doesn't allow synchronizing two or more M+ folders into the same folder on your PC. If you try to do so, you will receive a message explaining that. In that case you will have to create/choose another folder.
To remap a connected folder to another folder on your PC, simply click on the currently connected folder and specify another one.

To break a connection between folders, click the icon with a chain once so it turns into a red cross. All files that were already synchronized will remain on your PC.

If you decide to re-connect folders after breaking the connection between them, M+ Sync will scan the files and update the local copy to ensure they match with the M+ version. After that it will continue the synchronization.
To start the synchronization press the toggle to the right.

A progress bar for this folder will appear to the right. There will be also a summary progress bar at the bottom of the app window that will display the total progress and ETA for all folders currently being synchronized.
Files will be downloaded to the folder you have connected. If you're synchronizing a subfolder, a gray progress bar will appear for all folders containing it so that you won't miss what subfolders are being synchronized.
The app will keep periodically checking the M+ copy of the files for any new changes and will synchronize your local files to be up to date at all times. Interval of this check can be specified in settings as described above.
Two right-most columns contain basic information about the folders and their content: their total size and how many files and subfolders are inside.
Closing the app
On Windows clicking the close button in the top right corner will minimize the program into the taskbar. To close it completely, right click on the M+ Sync icon there and choose the quit command. Please note that Windows may hide infrequently used icons if you didn't disable it so you may have to click the button to reveal the hidden icons first. Alternatively, use Alt + F4 hotkey while the program window is active. On Mac OS X use Cmd + Q shortcut or close it in the Dock panel.
Removing the program
Use the standard uninstall methods to remove the program (Windows and Mac OS X) or just remove the program folder (Linux).