Подготовка, загрузка и сабмит файлов/en: различия между версиями
| (не показано 13 промежуточных версий 2 участников) | |||
| Строка 1: | Строка 1: | ||
| + | <languages/> | ||
MicroStock+ is an effective and comprehensive product that allows you to attribute, upload, and submit files without leaving your browser page. This guide will introduce you to the most important features, teach you how to submit files quickly and efficiently, and will also help you solving the most common issues related to this topic. We wish for all your files to be approved in advance! | MicroStock+ is an effective and comprehensive product that allows you to attribute, upload, and submit files without leaving your browser page. This guide will introduce you to the most important features, teach you how to submit files quickly and efficiently, and will also help you solving the most common issues related to this topic. We wish for all your files to be approved in advance! | ||
| Строка 14: | Строка 15: | ||
To successfully upload vector files to microstock agencies, you have to prepare a JPG thumbnail with an identical name (for example: filename.eps → filename.jpg). For the files to be correctly linked, the JPG thumbnail must be uploaded prior to submission. This can be done simultaneously with the vector file or at any point within 24 hours of the original upload. Failure to associate the files before submission will prevent them from being paired. | To successfully upload vector files to microstock agencies, you have to prepare a JPG thumbnail with an identical name (for example: filename.eps → filename.jpg). For the files to be correctly linked, the JPG thumbnail must be uploaded prior to submission. This can be done simultaneously with the vector file or at any point within 24 hours of the original upload. Failure to associate the files before submission will prevent them from being paired. | ||
| − | |||
| − | |||
== File upload == | == File upload == | ||
| Строка 37: | Строка 36: | ||
Uploaded files will appear in rows on the right side. A file with an upload error is marked by a red cross indicator, and a description of the error will replace the progress bar. A successfully uploaded file will be indicated by a green checkmark. To the right of the indicator, the file name, its type (and extension), its location path within M+, its size, and the upload time (accurate to the minute) are displayed. | Uploaded files will appear in rows on the right side. A file with an upload error is marked by a red cross indicator, and a description of the error will replace the progress bar. A successfully uploaded file will be indicated by a green checkmark. To the right of the indicator, the file name, its type (and extension), its location path within M+, its size, and the upload time (accurate to the minute) are displayed. | ||
| − | Please do not close the page or browser tab during upload, as this will interrupt the process. Instead, open M+ in a new tab or window and continue working there. Once all files have been successfully uploaded, M+ will notify you and prompt you to proceed to [[ | + | Please do not close the page or browser tab during upload, as this will interrupt the process. Instead, open M+ in a new tab or window and continue working there. Once all files have been successfully uploaded, M+ will notify you and prompt you to proceed to [[Special:MyLanguage/Управление файлами | My Files]]. |
Upon navigating to "My Files" after a successful upload, the information about image and video thumbnails is cleared from the uploading page interface but remains stored within M+. Therefore, there is no need to worry when you see that thumbnails have been replaced by file type icons. | Upon navigating to "My Files" after a successful upload, the information about image and video thumbnails is cleared from the uploading page interface but remains stored within M+. Therefore, there is no need to worry when you see that thumbnails have been replaced by file type icons. | ||
| Строка 90: | Строка 89: | ||
The fastest and easiest way fill in keywords is to use the QuickMeta feature. | The fastest and easiest way fill in keywords is to use the QuickMeta feature. | ||
| − | It is located to the left of the metadata editor itself and consists of one or two dropdown panels, a search bar, and a hide button. The number of panels depends on whether you have purchased the [[ | + | It is located to the left of the metadata editor itself and consists of one or two dropdown panels, a search bar, and a hide button. The number of panels depends on whether you have purchased the [[Special:MyLanguage/Работа с MicroStock+Trends|MicroStock+Trends]] payment plan. The QuickMeta feature works with both a single file and multiple files. |
If you don't need the QuickMeta feature, click the "Hide" button to the right of the search bar within the feature interface. | If you don't need the QuickMeta feature, click the "Hide" button to the right of the search bar within the feature interface. | ||
<gallery widths=400px heights=200px perrow=7> | <gallery widths=400px heights=200px perrow=7> | ||
| − | File:Hiding quickmeta.png|center|frame|Hide QuickMeta button | + | File:Hiding quickmeta eng.png|center|frame|Hide QuickMeta button |
| − | File:Opening quickmeta.png|center|frame|Open QuickMeta button | + | File:Opening quickmeta eng.png|center|frame|Open QuickMeta button |
</gallery> | </gallery> | ||
| Строка 105: | Строка 104: | ||
*The "Top" panel searches the Shutterstock database. This is a tool familiar to StockSubmitter users. Subscribers on advanced plans get access to higher-ranking top results. | *The "Top" panel searches the Shutterstock database. This is a tool familiar to StockSubmitter users. Subscribers on advanced plans get access to higher-ranking top results. | ||
| − | * The "Trending" panel showcases the assets with the fastest-rising rankings on Shutterstock. It is powered by a specialized database that filters out older content and ranks files by their sales performance. The [[ | + | * The "Trending" panel showcases the assets with the fastest-rising rankings on Shutterstock. It is powered by a specialized database that filters out older content and ranks files by their sales performance. The [[Special:MyLanguage/Работа с MicroStock+Trends#Индикатор трендовости|Trend indicator]] here functions identically to the one in the "My Files" section. |
The system works automatically. As soon as you enter the editor, our neural networks analyze your work and provide keyword suggestions. You can subsequently refine this selection by adding, deleting, or editing terms in the search bar at the top of the panel, then confirming with Enter. | The system works automatically. As soon as you enter the editor, our neural networks analyze your work and provide keyword suggestions. You can subsequently refine this selection by adding, deleting, or editing terms in the search bar at the top of the panel, then confirming with Enter. | ||
| Строка 212: | Строка 211: | ||
Before uploading, please make sure that your files are ready. You can check their status using the color-coded bar beneath each thumbnail or in the "Upload/Submit" tab. Select a file or group of files to view their current status across different microstock platforms. | Before uploading, please make sure that your files are ready. You can check their status using the color-coded bar beneath each thumbnail or in the "Upload/Submit" tab. Select a file or group of files to view their current status across different microstock platforms. | ||
| − | To upload successfully, your files must have the "Ready" status for your target microstock agency. If a file displays "Not Ready" or another error status (see our [[ | + | To upload successfully, your files must have the "Ready" status for your target microstock agency. If a file displays "Not Ready" or another error status (see our [[Special:MyLanguage/Статусы в MicroStock+ | detailed status guide]] for more information), hover your mouse cursor over the status message for troubleshooting suggestions. |
Finally, select the target microstock agencies with checkboxes, or click "Select All" to upload to all connected platforms. Click the "Upload Selected" button to begin. | Finally, select the target microstock agencies with checkboxes, or click "Select All" to upload to all connected platforms. Click the "Upload Selected" button to begin. | ||
Текущая версия на 17:00, 6 мая 2026
MicroStock+ is an effective and comprehensive product that allows you to attribute, upload, and submit files without leaving your browser page. This guide will introduce you to the most important features, teach you how to submit files quickly and efficiently, and will also help you solving the most common issues related to this topic. We wish for all your files to be approved in advance!
Содержание
- 1 Preparing your files
- 2 File upload
- 3 File attribution
- 4 Releases
- 5 Uploading to Microstock Agencies
- 6 Submitting to Microstock agencies
- 7 Most common file submission problems and solutions
Preparing your files
Before uploading files to any microstock agency, be sure to familiarize yourself with its requirements. Each microstock agency website has a dedicated section for this, and additional information can be found on relevant forums. If you missed a specific requirement - don't worry. If files don't meet known and measurable parameters, our product will not upload them to microstock agencies and will report an error.
Video content
We do not upload custom thumbnails to the microstock agencies. However, if you already have a thumbnail with embedded metadata, you can upload it to M+ along with the file. In this case, M+ will import the metadata into your video, but the thumbnail will be generated automatically by the microstock agency. Be sure to name the thumbnail the same as the video file!
Photos and raster illustrations
When uploading to M+, a thumbnail is generated automatically. You don't need to do this manually.
Vector files
M+ works with the .EPS files ONLY, even though some agencies support .AI and .CDR. Currently, the Adobe Illustrator 10 EPS version is considered the standard, but some agencies do not support .EPS files above Adobe Illustrator 8. EPS8 is considered an outdated format, and you should keep in mind that many modern effects (such as transparency and shadows) get rasterized in it.
To successfully upload vector files to microstock agencies, you have to prepare a JPG thumbnail with an identical name (for example: filename.eps → filename.jpg). For the files to be correctly linked, the JPG thumbnail must be uploaded prior to submission. This can be done simultaneously with the vector file or at any point within 24 hours of the original upload. Failure to associate the files before submission will prevent them from being paired.
File upload
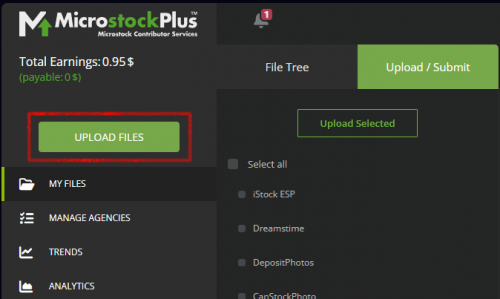
Before uploading files to the microstock agencies, you must first upload them to the M+ interface. Click "Upload Files" in the left menu to proceed to the upload page.
File uploading
Uploading section


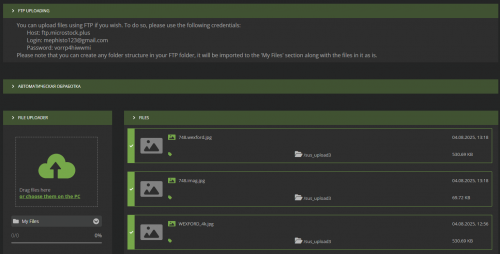
The instructions and FTP upload details are collapsed in the top section of the upload page (if you use an FTP client, such as FileZilla).
By the way, you can upload files via FTP along with your folder structure, and M+ will automatically recreate it within its own file system.
Sections below are responsible for uploading via M+.
- Before you begin, prepare JPG thumbnails for vector files. While these can be added later, it is more convenient to upload it immediately.
- Select a destination folder by clicking the dropdown list.
- Drag and drop one or multiple files into the window, or click the cloud icon to select them via your file explorer. You can pause or cancel the upload at any time using the corresponding buttons.
Uploaded files will appear in rows on the right side. A file with an upload error is marked by a red cross indicator, and a description of the error will replace the progress bar. A successfully uploaded file will be indicated by a green checkmark. To the right of the indicator, the file name, its type (and extension), its location path within M+, its size, and the upload time (accurate to the minute) are displayed.
Please do not close the page or browser tab during upload, as this will interrupt the process. Instead, open M+ in a new tab or window and continue working there. Once all files have been successfully uploaded, M+ will notify you and prompt you to proceed to My Files.
Upon navigating to "My Files" after a successful upload, the information about image and video thumbnails is cleared from the uploading page interface but remains stored within M+. Therefore, there is no need to worry when you see that thumbnails have been replaced by file type icons.
If you are working with a large number of heavy files or using a slow internet connection, file processing may take a considerable amount of time. For this reason, a queue is formed in the "My Files", displayed as thumbnails accompanied by information about the current processing progress. We ask for your patience during this stage.
However, if the estimated processing timer for files reaches zero, but the files do not appear in "My Files" for more than an hour, please contact technical support.
File attribution
This stage is also known as metadata entry. Each stock agency has its own metadata requirements, and we ask that you familiarize yourself with them independently before proceeding with attribution.
What are Batches and How to Name Them
Platforms like iStock and Dissolve require you to upload your works in small batches united by a common theme. Think of batches as folders or tags that group similar images together.
To ensure a successful upload, you need to select several similar works, click the "Name Batch" icon (which looks like a stack of papers), and enter any name. It can even be a random set of characters. When you upload them, the M+ system will automatically create this batch on the stock site and place all your selected works inside it.

Metadata editing
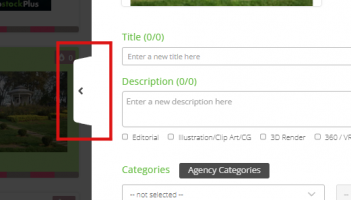
You can open the metadata editor by clicking the icon above the gallery in My Files, clicking the icon on a file's preview, or by double-clicking the file itself.
The metadata editor consists of two tabs: "Metadata" and "Releases".
Metadata Tab
This tab manages the metadata for the selected image.
- The "Copy" button allows you to copy the file's metadata: title, description, keywords, etc.
- The "Paste" button allows you to paste previously copied metadata into the current file fields, either filling in empty fields or replacing existing information. Please note that this action is irreversible once you confirm and save the file!
- Left click on the thumbnail will open an enlarged version of the file preview on the left.
- To configure AI content, first click the "AI" checkbox under the description.
- Click the "En" button to translate the contents of the "Title", "Description" and "Keywords" fields into English. The keywords must be entered or pasted into the field below the main keyword area, and you must click the "En" button BEFORE adding them to the list. We do not edit or guarantee the quality of the automated translation. You can choose either Microsoft or Yandex as the translation service. This setting can be changed in your personal account under "Interface Settings".
- For advanced microstock agency category settings, click the "Agency Categories" button.
- The "Pricing Editor" button opens additional pricing settings for 123rf, Pond5, GraphicRiver, VideoHive, and some other microstock agencies.
- The "Custom Agency Metadata" button opens individual settings for Pond5, GraphicRiver, and some other agencies.
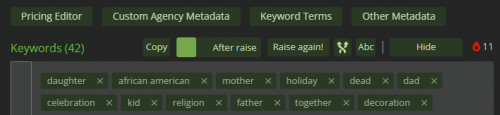
- To submit works to iStock ESP, you need to set Keyword Terms, which can be done using the "Keyword Terms" button. You can find details about them on the agency's website.
- "Other Metadata" opens additional settings required by specific stock agencies (for example, country and camera model).
- To add keywords, type or paste them into the special field under the list of current keywords and then press the "Enter" key.
- To delete all keywords, click the cross (X) on the left of the list. To remove an individual keyword, click the cross (X) to its right.
- To resize the field, drag its bottom-right corner.
- Keywords can be highlighted as text and then copied using your browser's features or standard keyboard shortcuts. When pasted, they will be automatically separated by spaces.
- The button with crossed lines shuffles the keywords into a random order.
- The "ABC" button arranges them in alphabetical order.
- The "Raise!" button removes non-trending keywords from the existing list and suggests more trending ones (based on M+ trends) with a similar theme. After clicking it, additional buttons will appear. You can review the changes using the toggle switch that shows the state before and after the "raise". Use the "New Raise!" button to generate a new set of keywords.
Raise! button menu

Filling in Keywords Using M+ QuickMeta
The fastest and easiest way fill in keywords is to use the QuickMeta feature.
It is located to the left of the metadata editor itself and consists of one or two dropdown panels, a search bar, and a hide button. The number of panels depends on whether you have purchased the MicroStock+Trends payment plan. The QuickMeta feature works with both a single file and multiple files.
If you don't need the QuickMeta feature, click the "Hide" button to the right of the search bar within the feature interface.
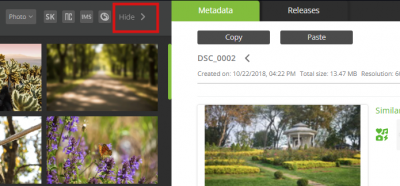
Hide QuickMeta button
Open QuickMeta button


For Safari users, the Open QuickMeta button will be located directly within the editor, next to the copy and paste metadata buttons.
If You Have an M+Trends Subscription
You have access to both QuickMeta panels. Your subscription plan determines how up-to-date the information on trending and top-performing images is. The more advanced your plan, the more current the data.
- The "Top" panel searches the Shutterstock database. This is a tool familiar to StockSubmitter users. Subscribers on advanced plans get access to higher-ranking top results.
- The "Trending" panel showcases the assets with the fastest-rising rankings on Shutterstock. It is powered by a specialized database that filters out older content and ranks files by their sales performance. The Trend indicator here functions identically to the one in the "My Files" section.
The system works automatically. As soon as you enter the editor, our neural networks analyze your work and provide keyword suggestions. You can subsequently refine this selection by adding, deleting, or editing terms in the search bar at the top of the panel, then confirming with Enter.
If You DO NOT Have an M+Trends Subscription
You have access to just one QuickMeta panel: "Top". This is a tool familiar to StockSubmitter users.
Simply type descriptive words for your image into the search bar at the top of the panel and press Enter. You'll see relevant image thumbnails appear below. Click on any thumbnail to automatically input its keywords into your file's metadata (on the right).
From there, you can either select individual keywords by clicking on them, or use the dedicated buttons to copy the first 50 or 80 keywords all at once.
To copy a title and description, hover your mouse over any thumbnail and click the green icon next to the title. This will automatically fill or replace your file's title and description fields with the content from the selected image.
How do I use QuickMeta feature?
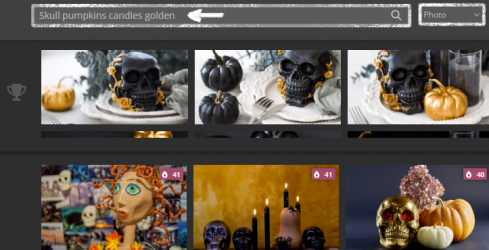
The search bar and content type selection
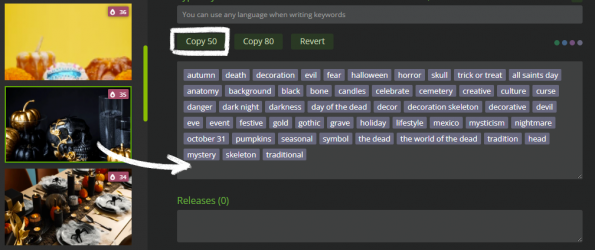
Copying keywords from the buffer


Here is the step-by-step process:
- Upload your file(s) to M+ and wait for them to appear in "My Files" gallery.
- Access the metadata editor by double-clicking a thumbnail, clicking the icon on the image, or using the gallery's top menu.
- If the QuickMeta panel is hidden, open it.
- Select the content type from the dropdown list to the right of the search bar (at the panel's top).
- If you have an "M+ Trends" subscription:
- The search field will be inputted automatically. You can modify the terms manually and press Enter to refresh the query.
- You have an access to both the upper "Top" tab and the lower "Trending" tabs. To search exclusively within trending images, select any thumbnail in the lower tab - it will expand while the "Top" tab collapses.
- If you DO NOT have an "M+ Trends" subscription:
- Enter your search terms and press Enter. Wait for the query to process.
- Select one or more metadata "donors" by clicking the resulting thumbnails. Click again to remove from selection.
- To copy a donor's title and description to your work:
- Hover your mouse cursor over any thumbnail in "Trending" or "Top" panels - the title will appear over the image.
- Click the icon to the left of the title to automatically populate your file's title and description fields.
- To copy individual keywords:
- Click any keyword in the buffer.
- Padding color helps identify the most effective options. For detailed keyword ratings, hover over the colored circles icon on the right.
- To copy 50 or 80 keywords at once, use the "Copy 50"/"Copy 80" buttons.
- The "Revert" button will remove ALL keywords.
- Don't forget to save your changes!
See more about keywords editing
Attached releases
The list of attached model or property releases appears directly below the keyword buffer. You can adjust the height of this field by clicking and dragging the bottom-right corner. To attach a release, you must first create one in the "Releases" tab. Once a release is attached, you can remove it at any time by clicking the "X" next to its name.
Bottom Panel Buttons
At the very bottom of the metadata editor, you'll find the following buttons (from left to right):
- Click navigation arrows to move between files in the folder.
- "Clear" button removes ALL metadata from the file. This action is permanent once saved.
- "Close" button closes the metadata editor.
- "Save" button applies and saves your changes.
Releases
A release is a legal agreement between you and any recognizable person in your work, or the owner of private property featured in your photo or video.
We recommend checking the specific release requirements on the websites of the stock agencies where you plan to distribute your content.
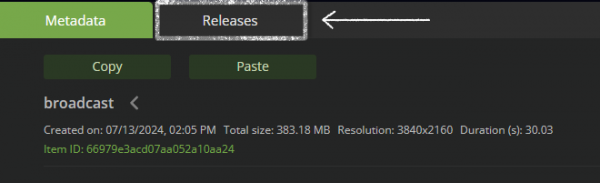
Releases tab

Important Notice! Please DO NOT attach releases to your files by dragging them into the Easy Release field! This method is designed EXCLUSIVELY for release files created in Easy Release PRO with the StockSubmitter/M+ integration feature enabled.
This feature is not available on iOS yet.
Releases
To get started, navigate to the Releases (see image above). M+ allows you to create a database for all your releases, which you can then easily attach to your files. Below is an overview of the Release Manager's layout and its key functions.
The number next to "Releases" indicates how many releases are attached to the current file (in this case, none are attached).

- Search bar – Enter a name to filter releases in your database, then click "Filter".
- Sorting – Click any column header to sort your releases. The arrow indicates the sort direction (ascending or descending).
- Release Card displays an individual release. It shows the release's thumbnail, name, type, date, and other details. Use the paperclip button to attach/detach the release from your file (a green border indicates it's attached).
- Release Actions (from left to right):
- Attach/Detach
- Edit
- Duplicate
- Delete
- "Create Release" button creates a new release.
- "Unattach All" button detaches all attached releases (this action is irreversible once saved!)
- "Save" button applies and saves your changes
Use navigation arrows to move between files in the folder without switching between the tabs or closing Metadata editor. Don't forget to save your changes!
Creating a New Release
Simply click the "Create release" button located at the bottom of the interface (see point above) and follow the step-by-step instructions.
- Select the release type: Property Release or Model Release.
- Attach the release file.
- Fill in all required fields carefully. For dates, you can use the calendar icon.
- By default, the release is available for all stock sites, but you can specify platforms in the "Upload to" field.
- Click the "Create Release" button.
This release is now ready to be attached to your files.
Uploading to Microstock Agencies
Before uploading, please make sure that your files are ready. You can check their status using the color-coded bar beneath each thumbnail or in the "Upload/Submit" tab. Select a file or group of files to view their current status across different microstock platforms.
To upload successfully, your files must have the "Ready" status for your target microstock agency. If a file displays "Not Ready" or another error status (see our detailed status guide for more information), hover your mouse cursor over the status message for troubleshooting suggestions.
Finally, select the target microstock agencies with checkboxes, or click "Select All" to upload to all connected platforms. Click the "Upload Selected" button to begin.
Submitting to Microstock agencies
What is a Submit?
A submit is the automated process of filling in all metadata fields for a single file and sending it for review by microstock agency inspectors.
Submits are counted separately for each microstock agency. For example, if you're subscribed to Like payment plan and work with, you can make 2,500 submits per month, 250 for each agency. When using M+ with StockSubmitter, you only pay for submits.
Every user receives 33 free submits monthly per agency (with Free payment plan). Submits to iStock ESP, Dreamstime, YayImages, and Pond5 are always unlimited and free.
We provide free and unlimited submits to all novice contributors who have never purchased a paid subscription and have total earnings below $50 across all stock agencies. This feature will be permanently disabled once your total earnings reach $50.
To activate the offer enable the "Permit collecting and displaying earnings data" setting in your dashboard.
In M+, files are automatically submitted to agencies right after a successful upload. When your metadata is correct and our servers handle the upload reliably, there's no reason to delay submission.
If a submit is blocked (e.g., due to running out of submissions or the file not yet appearing on the agency side), M+ will keep retrying. Once the issue is resolved, the submission will proceed within one hour after the last failed attempt.
Upon completion, files will show the "Submitted" status. Depending on the agency's response, this will later update to either "Accepted" or "Rejected" (for agencies that support this feature).
Most common file submission problems and solutions
I dragged a release file into "Releases" but can't find it in the list!
Please note: Drag-and-drop in the Releases tab works exclusively for files created in Easy Release PRO with StockSubmitter / M+ integration enabled.
For all other releases, please use the "Create Release" creation form.
Why did a duplicate of my file appeared on the microstock agency?
This usually happens because you submitted the files manually on the agency's website after M+ has already uploaded them. It causes M+ to lose track and retry the upload.
If you submit files manually, remember to set their status to "Submitted" in M+ immediately after uploading them to the microstock agency.
Why are my files stuck in the queue for so long?
Stock agencies often restrict multi-threaded uploads, so M+ mimics human user behavior to avoid triggering security alerts. While this process is typically fast, you may see the "In Queue" status for longer periods during heavy uploads or when agency servers are overloaded. If the queue is progressing, there's no need to worry.
If a file shows a "Connection Error" with a timer under the "Uploading" status, M+ will automatically retry at intervals until the connection with the microstock server is restored.
Internal Error
If this error persists for more than an hour and you're able to upload/submit files directly on the microstock agency's website without issues, please contact our technical support team for assistance.
Subscription Problem on VectorStock
This error occurs when you've run out of available submits while uploading to VectorStock. On this platform, submission happens instantly during the upload process, so without available submits, uploading becomes impossible.
To resolve an issue either upgrade to a higher subscription plan or increase the limit for this month. After that, change the file status for VectorStock to "Ready" and re-upload.