Translations:Работа с MicroStock+ Sync/8/en: различия между версиями
(Новая страница: «===Launching and configuring the M+Sync=== During the first program launch you'll have to choose or create the folder as a start point for synchronization process...») |
(нет различий)
|
Версия 20:38, 12 февраля 2021
Launching and configuring the M+Sync
During the first program launch you'll have to choose or create the folder as a start point for synchronization process. You can change it later, but this means downloading all synchronizing files again. Once the folder is chosen/created, you'll be able to manage the program using the top menu.
- Click "Account" to log out or go to the store (pricing);
- Click "Settings" to able/disable autorun, change the interface language and set a synchronization interval (in minutes);
- Click "Help" to open a support chat or go to this article (M+ FAQ).
Working with folders
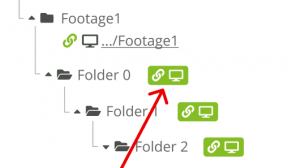
To synchronize any M+ folder with a folder on your PC you have to create a connection between them. In a left column (File tree) choose a folder you want to synchronize, click a green icon with a PC and link chain on it and assign any folder on your PC (or choose/create another folder inside of the start folder). When you synchronize a folder, all subfolders inside of it will be automatically synchronized as well and you don't need creating a connection for them.
Во избежание путаницы и ошибок система не позволяет синхронизировать две папки из М+ в одну папку на ПК, и если вы попытаетесь это сделать, то получите соответствующее уведомление. В этом случае вам следует создать ещё одну папку внутри существующей или выбрать другую.
Чтобы переназначить папку для синхронизации, просто кликните по названию папки, куда синхронизируется папка М+ и переназначьте её.
