Управление файлами/en: различия между версиями
| (не показаны 22 промежуточные версии этого же участника) | |||
| Строка 1: | Строка 1: | ||
| − | + | All post-upload file management operations are performed within the My Files section. If you're not already there after [[Special:MyLanguage/Подготовка, загрузка и сабмит файлов | the uploading]], simply select "My Files" from the left-hand navigation panel. | |
=Section Layout= | =Section Layout= | ||
| Строка 9: | Строка 9: | ||
=File Gallery= | =File Gallery= | ||
| − | The M+ file gallery | + | The M+ file gallery provides key actions like metadata editing, moving files between folders, sorting them, and tracking file statuses. Let's take a closer look at the gallery structure to help you use all its features effectively. |
<gallery widths=650px heights=400px perrow=7> | <gallery widths=650px heights=400px perrow=7> | ||
| Строка 23: | Строка 23: | ||
==2. The Search Bar== | ==2. The Search Bar== | ||
| − | + | Type your search query (e.g. file name, description or ID) in the bar and then hit Enter or click the magnifying glass icon to search across the current folder. To search across all your files, navigate to the root "My Files" folder first and perform your search from there. | |
==3. Sorting== | ==3. Sorting== | ||
| − | Clicking this button will open the advanced file sorting settings. You can sort files by title, description, file status on microstock platforms, and other parameters. It also includes an option for random file order. Here, you can also set the number of | + | Clicking this button will open the advanced file sorting settings. You can sort files by title, description, file status on microstock platforms, and other parameters. It also includes an option for random file order. Here, you can also set the number of thumbnails displayed per page in your gallery. |
==4. Number of Selected Objects== | ==4. Number of Selected Objects== | ||
| Строка 55: | Строка 55: | ||
== 8. Hide filenames == | == 8. Hide filenames == | ||
| − | Clicking this button hides the names of all files. Click it again to show them | + | Clicking this button hides the names of all files. Click it again to show them. |
== 9. "Breadcrumbs" == | == 9. "Breadcrumbs" == | ||
| − | This is the address bar showing your current location within the M+ folder structure. The icon to the | + | This is the address bar showing your current location within the M+ folder structure. The icon to the left of the address allows you to return to one of your recently visited folders. |
== 10. Pages == | == 10. Pages == | ||
| − | The number displays the total page count in the current folder. You can adjust the number of file | + | The number displays the total page count in the current folder. You can adjust the number of file thumbnails displayed per page in the [[#3. Sorting | sorting settings]]. |
== 11. File card == | == 11. File card == | ||
| Строка 74: | Строка 74: | ||
| − | The file | + | The file thumbnail is displayed prominently in the center of the card. Beneath it, you'll see the file's name (when visible), description, and a [[Special:MyLanguage/Статусы в MicroStock+ | color-coded bar]] that shows its submission status on various microstock agencies. |
<gallery widths=300px heights=250px perrow=7> | <gallery widths=300px heights=250px perrow=7> | ||
| Строка 84: | Строка 84: | ||
# Copy selected file Metadata; | # Copy selected file Metadata; | ||
# Paste Metadata. This option appears only when you have metadata from another file on your clipboard; | # Paste Metadata. This option appears only when you have metadata from another file on your clipboard; | ||
| − | # View Enlarged | + | # View Enlarged Thumbnail. Click to see a larger thumbnail. Close it by clicking the "X" in the top-right corner or clicking on an empty area. Use the arrow keys to navigate between thumbnails within the folder. |
# File Information. Click to view essential details about the file: | # File Information. Click to view essential details about the file: | ||
## Uploaded to M+. The exact date and time (to the minute) the file was uploaded to M+; | ## Uploaded to M+. The exact date and time (to the minute) the file was uploaded to M+; | ||
| Строка 129: | Строка 129: | ||
'''Folder Action Icons (Left to Right):''' | '''Folder Action Icons (Left to Right):''' | ||
| − | # '''A Paper sheet with an arrow''' - moves selected files into this folder. Select files in the Gallery, hover over the folder, then click this icon. (Visible only when files are selected). | + | # '''A Paper sheet with an arrow''' - moves selected files into this folder. Select files in the Gallery, hover your mouse over the target folder in File Tree, then click this icon. (Visible only when files are selected). |
# '''Folder with plus''' - creates a new folder inside the current folder. Click the icon, enter a name for the new folder, and press Done. | # '''Folder with plus''' - creates a new folder inside the current folder. Click the icon, enter a name for the new folder, and press Done. | ||
| − | # '''Trash Bin''' - deletes this folder. Important: | + | # '''Trash Bin''' - deletes this folder. Important: it must be empty. Move or archive its files before you delete the folder. |
| − | # '''Suitcase''' - moves the entire folder (with all contents) elsewhere. Click, then paste the destination path (copying from the [[9. "Breadcrumbs" | "Breadcrumbs"]] is advised). | + | # '''Suitcase''' - moves the entire folder (with all contents) elsewhere. Click, then paste the destination path (copying from the [[9. "Breadcrumbs" | "Breadcrumbs"]] is advised). "/" means the My Files root. |
# '''Share Icon''' - allows you to grant other users access to this folder. For detailed instructions, see [[Special:MyLanguage/Совместная работа в MicroStock+ через предоставление доступа к папкам | this guide]]. | # '''Share Icon''' - allows you to grant other users access to this folder. For detailed instructions, see [[Special:MyLanguage/Совместная работа в MicroStock+ через предоставление доступа к папкам | this guide]]. | ||
# '''A paper sheet with a pencil''' - opens an order form for AI keywording of all files within this folder. | # '''A paper sheet with a pencil''' - opens an order form for AI keywording of all files within this folder. | ||
| − | + | To sort the folders, hover a mouse cursor over the icon in the top-right corner of the File Tree panel. From the dropdown menu, choose the sorting method (e.g., by name) and the desired order (ascending or descending). | |
| − | |||
| − | |||
| − | |||
<gallery widths=270px heights=200px perrow=7> | <gallery widths=270px heights=200px perrow=7> | ||
| − | File:Folder sorting.jpg|center|frame| | + | File:Folder sorting.jpg|center|frame|File tree sorting options |
</gallery> | </gallery> | ||
| − | |||
| − | + | The arrow displays and controls the sort order. Clicking the upward arrow when sorting by name will order folders from Z to A (descending). Clicking the downward arrow will order them from A to Z (ascending). This same directional principle governs sorting by other criteria as well. | |
| − | |||
| − | |||
| − | + | =Upload/Submit tab= | |
| − | |||
<gallery widths=600px heights=300px perrow=7> | <gallery widths=600px heights=300px perrow=7> | ||
| − | File:Submits section.png|center|frame| | + | File:Submits section.png|center|frame|Upload/Submit tab |
</gallery> | </gallery> | ||
| − | |||
| − | + | The Upload/Submit tab allows tracking and, when possible, updating the current status of your files. To open it, click the "Upload/Submit" tab next to the File Tree. For fast access, press Alt+S on your keyboard. | |
| − | |||
| − | |||
| − | + | Each file uploaded through M+ and StockSubmitter receives a distinct status for every connected microstock agency. The status system allows you to monitor your file's exact position in the review queue at all times, from upload until final decision (acceptance or rejection), where such statuses are supported by the respective microstock agency. | |
| − | |||
| − | |||
| − | + | To view or modify the status for one or several files, first select the files in the Gallery on the right. Once selected, go to the Upload/Submit tab to see its status across all your connected stock agencies. If you have not yet configured any agencies and need help, please read the dedicated [[Special:MyLanguage/Подключение стоков в MicroStock+|guide]]. | |
| − | |||
| − | |||
| − | + | ===Complete Submission Workflow in M+=== | |
| − | === | + | # Verify that your files meet the stock agency's requirements, including correct resolution, supported content type, and the presence of a preview for vector files. For a comprehensive guide, refer to [[Special:MyLanguage/Подготовка, загрузка и сабмит файлов | this guide]]. |
| − | # | + | # Confirm that the file has been successfully uploaded to our system and that its file card appears normal — meaning it does not currently display a loading spinner, countdown timer, or any error message. |
| − | # | + | # Select the file or files you wish to submit and fill in their [[Special:MyLanguage/Подготовка, загрузка и сабмит файлов#Атрибутирование файлов | metadata]] manually, by using quickmeta, or by placing an order for AI keywording. In the latter case, await order completion and remember to verify the data accuracy. |
| − | # | + | # Attach necessary [[Special:MyLanguage/Подготовка, загрузка и сабмит файлов#Релизы | model or property releases]] to the files, if applicable. Our system cannot automatically determine which files require releases, so, please review this step carefully. |
| − | # | + | # Save the metadata |
| − | # | + | # Go to the Upload/Submit tab while keeping the files selected. Typically, if a file meets the requirements for the selected agency or agencies, its status will be "Ready to Upload". In this case, simply select the target agencies (or click "Select All") and press the Upload button. Alternatively, you may [[Special:MyLanguage/Статусы в MicroStock+#«Запланировано» | schedule the upload]] for later. |
| − | # | + | # Wait for the status to change to "Uploaded" (without an error). |
| − | # | + | Typically, no further action is required. The final submission and approval process will be carried out automatically without your direct involvement. not all agencies provide M+ with approval/rejection status tracking. For the most accurate and up-to-date information, please check the website of the respective microstock agency. |
| − | |||
| − | |||
| − | + | To manually change a file's status for a specific stock agency, first hover the mouse over the status within the list or the three-dot menu icon (vertical ellipsis) located to the right of the agency's name. Then choose the desired status from the appeared list and confirm by pressing OK. For applying a status for multiple or all connected agencies, select the target agencies manually or use the "Select All" option. Then, hover over the three-dot menu adjacent to any of the selected agency names and follow the same steps to set the status. | |
| − | |||
| − | |||
| − | + | For detailed information on this topic, including how to plan uploads and address submission errors, [[Special:MyLanguage/Статусы в MicroStock+ | see the article]]. | |
| − | |||
| − | |||
Текущая версия на 19:19, 16 декабря 2025
All post-upload file management operations are performed within the My Files section. If you're not already there after the uploading, simply select "My Files" from the left-hand navigation panel.
Содержание
- 1 Section Layout
- 2 File Gallery
- 3 File Tree
- 4 Upload/Submit tab
Section Layout
The right side of the "My Files" section is dedicated to a gallery of your work, presented as cards. It is controlled by a panel of icons above it and each function is explained in the "Gallery" section. Above the file gallery, you'll find information about the available cloud storage space in your possession, a search bar, and sorting options.
To the left of the gallery, there are two tabs. The "File Tree" tab displays the folder structure within the M+ interface. The "Upload/Submit" tab shows the status of your files both within M+ and on microstock agencies.
File Gallery
The M+ file gallery provides key actions like metadata editing, moving files between folders, sorting them, and tracking file statuses. Let's take a closer look at the gallery structure to help you use all its features effectively.
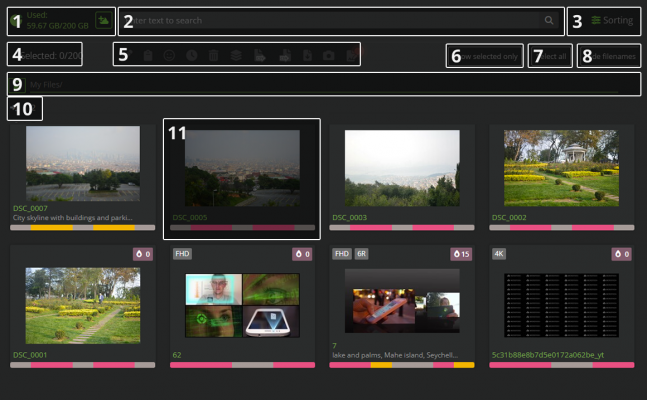
File gallery layout. The legend is presented below

1. Managing Your M+ Cloud Storage
The first number displays how much space your files currently occupy, while the second shows the total capacity of your M+ cloud storage. To the right, a button links directly to the MicroStock+Storage service. Every user gets 100 GB of space for free and can upgrade at any time to rent up to an additional 4 TB of storage.
Please note that if your payment is overdue, the upload function to M+ will be blocked. Access will only be restored once you either delete enough files to meet the 100 GB free limit or renew your additional storage subscription. If the issue is not resolved within one month, we will be required to remove some of your files from the service. See more about MicroStock+Storage payment package.
2. The Search Bar
Type your search query (e.g. file name, description or ID) in the bar and then hit Enter or click the magnifying glass icon to search across the current folder. To search across all your files, navigate to the root "My Files" folder first and perform your search from there.
3. Sorting
Clicking this button will open the advanced file sorting settings. You can sort files by title, description, file status on microstock platforms, and other parameters. It also includes an option for random file order. Here, you can also set the number of thumbnails displayed per page in your gallery.
4. Number of Selected Objects
This indicator shows the count of files currently selected and the total number of files in the current folder.
5. Icon panel above the File gallery
First, select the file or files you wish to manage. Upon selection, a control panel with icons will appear above the File gallery. This panel contains functions for editing both individual files and multiple selections at once.
Available actions (from left to right):
- Edit metadata for all selected files;
- Paste metadata (appears only with metadata on your clipboard). Metadata can be copied in Metadata editor. Please note: Pasting will replace the metadata in all selected files, and this action cannot be undone!
- Assign a specific file status to a file or group of files for all microstock agencies.
- Schedule file uploads. See more here.
- Delete files, which permanently removes them from storage and moves their thumbnails to the archive.
- Specify a batch name.
- Export metadata in CSV format.
- Import metadata from a CSV file.
- Download files to your computer. Downloads work for one file at a time. To download a large number of files, we recommend using the free M+Sync app.
- Order AI keywording.
6. Show Selected Only
Toggle this button to filter the gallery, showing only your selected works. This is useful for focused review. Toggle it off to see all files again. Important: To clear a selection, you need to disable this mode.
7. Select all
Clicking this button selects all files within the current folder. Click it again to clear the selection.
8. Hide filenames
Clicking this button hides the names of all files. Click it again to show them.
9. "Breadcrumbs"
This is the address bar showing your current location within the M+ folder structure. The icon to the left of the address allows you to return to one of your recently visited folders.
10. Pages
The number displays the total page count in the current folder. You can adjust the number of file thumbnails displayed per page in the sorting settings.
11. File card
Each file is represented by a card displaying its key information. A left-click on a card selects that file; a second click on it deselects it. You can also select multiple files at once by holding the Shift key while clicking on them sequentially, or by clicking and dragging to draw a selection rectangle, similar to how you select items in your operating system's file explorer.
At the top of the card (from left to right) you will find:
- File resolution/type (and its preview, if available);
- The number of attached model/property releases (e.g., 1R, 2R);
- The file's trend indicator.
The file thumbnail is displayed prominently in the center of the card. Beneath it, you'll see the file's name (when visible), description, and a color-coded bar that shows its submission status on various microstock agencies.
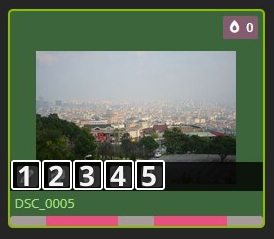
File card icons menu. See details below.

Available actions, from left to right:
- Metadata Editing. To edit multiple files at once, select them and click the pencil icon on the appeared panel of any selected card. All selected works will open in the editor;
- Double-clicking any card will open only that single file in the metadata editor;
- Copy selected file Metadata;
- Paste Metadata. This option appears only when you have metadata from another file on your clipboard;
- View Enlarged Thumbnail. Click to see a larger thumbnail. Close it by clicking the "X" in the top-right corner or clicking on an empty area. Use the arrow keys to navigate between thumbnails within the folder.
- File Information. Click to view essential details about the file:
- Uploaded to M+. The exact date and time (to the minute) the file was uploaded to M+;
- Shoot/Creation date. The date and time when the photo was taken or the file was created;
- Image size. The file's weight in GB;
- Files in storage. Lists the file's extension and the resolution of its attached thumbnail (if applicable);
- ID (Identifier): The file's unique ID. Hover over it and click to copy it to your clipboard;
- Batch Name, if one is assigned;
- File name.
Handling "Broken" Files and Files in Queue
A file card typically displays its thumbnail. However, there are two specific cases where this is not possible.
First Case — when a file is particularly large or when you have uploaded a significant number of files simultaneously. These files have been uploaded successfully but are still being processed by our servers. In this case, a spinner will appear on the card instead of a thumbnail, with the estimated time (in hours) until they become available in "My Files" displayed below it.
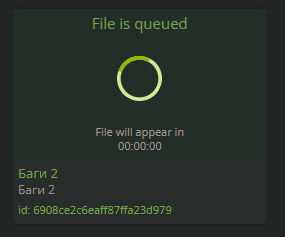
A card with a spinner

No action is required in this case. However, if the queue is delayed for more than 24 hours and the timer is not counting down, please contact technical support. If the timer is absent altogether, re-upload the file to M+.
Second Case — when an error occurs during the file upload process. The file was processed incorrectly: some data was lost, an internal error occurred, and so on. As a result, the file becomes "broken" or fails to load properly.
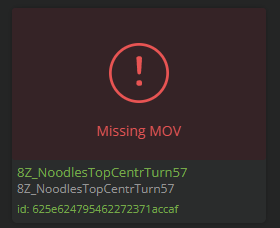
"Broken file" card

To access available actions for a folder, hover your mouse over its name. An icon panel will appear to the right.
Missing MOV — Upload a video in MOV format for this file.
Missing API and comparable errors — resolve the issue by archiving "broken" files, and re-upload them to M+.
File Tree
The File Tree is a visual representation of your directory structure, similar to the file explorer in your operating system. The root folder is always "My Files". All other folders are created, moved, and organized within this root directory. To toggle the visibility of the File Tree panel, press Shift+T.
To expand a folder, click the chevron to the left of its icon. Click it again to collapse the folder. If a folder has no chevron, it contains no subfolders.
To access available actions for a folder, hover your mouse over its name. An icon panel will appear to the right.
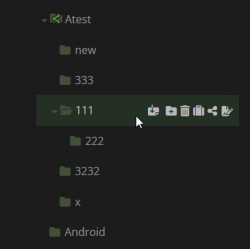
Folder icons panel
Folder Action Icons (Left to Right):
- A Paper sheet with an arrow - moves selected files into this folder. Select files in the Gallery, hover your mouse over the target folder in File Tree, then click this icon. (Visible only when files are selected).
- Folder with plus - creates a new folder inside the current folder. Click the icon, enter a name for the new folder, and press Done.
- Trash Bin - deletes this folder. Important: it must be empty. Move or archive its files before you delete the folder.
- Suitcase - moves the entire folder (with all contents) elsewhere. Click, then paste the destination path (copying from the "Breadcrumbs" is advised). "/" means the My Files root.
- Share Icon - allows you to grant other users access to this folder. For detailed instructions, see this guide.
- A paper sheet with a pencil - opens an order form for AI keywording of all files within this folder.
To sort the folders, hover a mouse cursor over the icon in the top-right corner of the File Tree panel. From the dropdown menu, choose the sorting method (e.g., by name) and the desired order (ascending or descending).
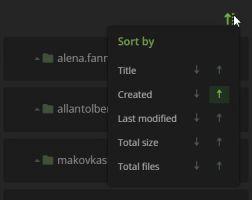
File tree sorting options

The arrow displays and controls the sort order. Clicking the upward arrow when sorting by name will order folders from Z to A (descending). Clicking the downward arrow will order them from A to Z (ascending). This same directional principle governs sorting by other criteria as well.
Upload/Submit tab
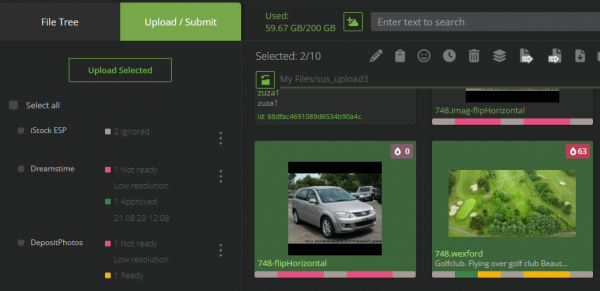
Upload/Submit tab

The Upload/Submit tab allows tracking and, when possible, updating the current status of your files. To open it, click the "Upload/Submit" tab next to the File Tree. For fast access, press Alt+S on your keyboard.
Each file uploaded through M+ and StockSubmitter receives a distinct status for every connected microstock agency. The status system allows you to monitor your file's exact position in the review queue at all times, from upload until final decision (acceptance or rejection), where such statuses are supported by the respective microstock agency.
To view or modify the status for one or several files, first select the files in the Gallery on the right. Once selected, go to the Upload/Submit tab to see its status across all your connected stock agencies. If you have not yet configured any agencies and need help, please read the dedicated guide.
Complete Submission Workflow in M+
- Verify that your files meet the stock agency's requirements, including correct resolution, supported content type, and the presence of a preview for vector files. For a comprehensive guide, refer to this guide.
- Confirm that the file has been successfully uploaded to our system and that its file card appears normal — meaning it does not currently display a loading spinner, countdown timer, or any error message.
- Select the file or files you wish to submit and fill in their metadata manually, by using quickmeta, or by placing an order for AI keywording. In the latter case, await order completion and remember to verify the data accuracy.
- Attach necessary model or property releases to the files, if applicable. Our system cannot automatically determine which files require releases, so, please review this step carefully.
- Save the metadata
- Go to the Upload/Submit tab while keeping the files selected. Typically, if a file meets the requirements for the selected agency or agencies, its status will be "Ready to Upload". In this case, simply select the target agencies (or click "Select All") and press the Upload button. Alternatively, you may schedule the upload for later.
- Wait for the status to change to "Uploaded" (without an error).
Typically, no further action is required. The final submission and approval process will be carried out automatically without your direct involvement. not all agencies provide M+ with approval/rejection status tracking. For the most accurate and up-to-date information, please check the website of the respective microstock agency.
To manually change a file's status for a specific stock agency, first hover the mouse over the status within the list or the three-dot menu icon (vertical ellipsis) located to the right of the agency's name. Then choose the desired status from the appeared list and confirm by pressing OK. For applying a status for multiple or all connected agencies, select the target agencies manually or use the "Select All" option. Then, hover over the three-dot menu adjacent to any of the selected agency names and follow the same steps to set the status.
For detailed information on this topic, including how to plan uploads and address submission errors, see the article.